
Multiple authentication use cases for RADIUS clients
- Matt Sherif

- Aug 30, 2019
- 3 min read
You recently bought FortiAuthenticator, you've deployed it, and you even configured it to perform admin authentication on your FortiGate. Now you're being asked by management to use it for 2-Factor Authentication (2FA) for SSL VPN for Sara Tanner, the new consultant from Company X that you hired to help you implement your Flux Capacitor.

There are a number of articles out there that cover setting up FortiGate and FortiAuthenticator for 2FA, but none of them ever cover the multiple use cases. What if I want to do admin 2FA AND SSL-VPN 2FA. There's some special configuration that needs to take place on FortiAuthenticator for this to happen. We'll go over those steps in this article.
Assumptions
FortiAuthenticator 6.0+ is deployed
FortiOS 6.0.5+ is on the fortigate
FortiAuthenticator is configured to use LDAP (or some other external authentication source if needed) and the FortiGate is already set up as a Radius Client
FortiToken Mobile is being used - for push notifications
Create a Group for Company X
We could map Sara directly to a SSL-VPN portal on the FortiGate, but that approach isn't scalable if we need to add more consultants from Company X. The better practice would be to create a group, and assign permission to that group.
In FortiAuthenticator go to Authentication > User Management > User Groups and click 'Create New'
For the sake of this example, we will set this up as a Remote LDAP group type
User Retrieval: LDAP Filter
Remote LDAP: Your LDAP/AD server
LDAP Filter: An LDAP Query that can pull the members of the group from AD. The AD Query builder in windows server is really handy in building these queries
Alternately you can choose a list of imported LDAP users to assign to this group.
RADIUS Attributes: Fortinet-Group-Name = companyx

Configuring a second profile for SSL VPN authentication
Because we now have two use cases for RADIUS authentication from the same client, we now need to configure a second profile for the RADIUS client to use for SSL VPN authentication. We will use RADIUS attributes to filter for this new profile, support documentation states that you should run a packet capture and attempt to log in to determine what attributes you can use, for this example, I already ran the capture and know we can use the "Connect-info" attribute and value of "vpn-ssl"

Login to FortiAuthenticator and go to Authentication > RADIUS Service > Clients
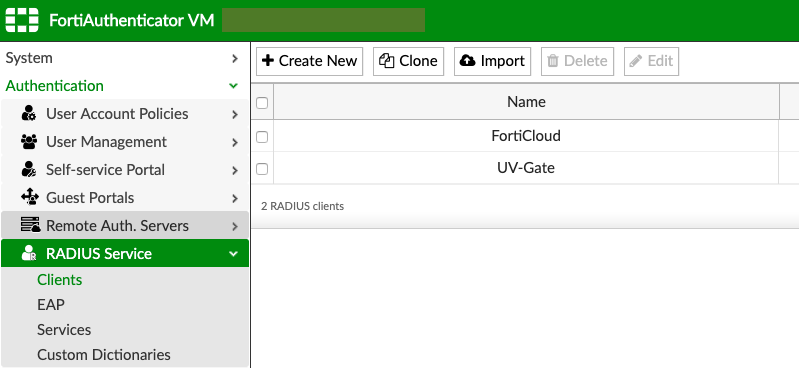
Click on the client you want to add a profile to, in this case I'm going to click on UV-Gate
In the client page, click on 'Add New Profile'
Give the new profile a name, I'll use "SSL-VPN"
Enable "Apply this profile based on RADIUS attributes"
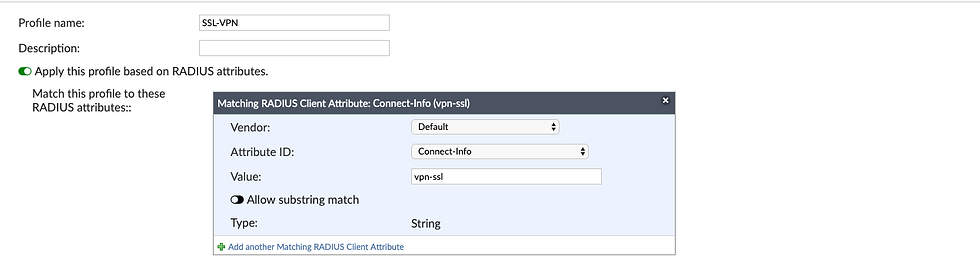
I also chose "Enforce two-factor authentication"
Choose the username input format you need
Add the realms you're authenticating against and the groups you'd like to filter

Click 'Save' - wait for the page to tell you the save was successful otherwise if you click OK too soon it will throw an error.
Click OK
Creating the Company X group on FortiGate
Navigate to User & Device > User Groups and click 'create new'
Group name: Radius-Company-X
Remote Groups: Click 'Add'
Choose your FortiAuthenticator as your remote server
Specify the group, in this case it's based on the attribute we assigned the Company X group in FortiAuthenticator, companyx
Click OK
Click Apply

Creating a portal mapping for Company X users:
In a previous article, we described how to create portals for users and user groups. We'll map the Radius-Company-X users to the Company X portal.
Navigate to VPN > SSL-VPN Settings
In Authenticaiton/Portal Mapping click 'Create New'
Users/Groups: Radius-Company-X
Portal: Company X
Click OK
Click Apply

Creating Policies to allow access to resources
You will need to create policies to allow Company X users access to the resources they need. If you have no policy assigned, users will be denied logon permission.
Navigate to Policy & Objects > IPv4 Policy
Click 'Create New'
Name: Company X access to remote desktop
Incoming Interface: SSL VPN tunnel Interface (ssl.root)
Outgoing Interface: The outgoing interface
Source: The SSL VPN IP range
Destination: The RDP host(s) we're providing access to
Service: RDP in this case
NAT: Off
Enable any and all security profiles as necessary

Testing Access
I will be using the mobile push feature, so you will not see me enter the token code on screen.
Thank you for reading, I hope this has been helpful.


Comments