
FortiGate SSL VPN with Azure MFA using SAML
- Matt Sherif

- Aug 13, 2020
- 4 min read
Updated: Oct 17, 2020
In a previous post we talked about setting up FortiGate SSL VPN authentication and Azure MFA using Azure MFA extension for NPS, which requires you to set up a Microsoft Network Policy and Access Server (generally known as NPS). As u/Wippwipp pointed out on Reddit that it appears the 6.4.0 new features section shows the ability to use FortiAuthenticator as SAML IdP which got me thinking if this could work with Azure - after all SAML is SAML - and if so, how is it done.
In this article we'll take a look at this together.
Assumptions:
FortiOS version: The Fortinet article says this is a new feature in 6.4.0, I am using 6.4.2 as of the writing of this article
FortiClient version: Also 6.4.0 - I will attempt this with the FortiClient VPN (Free version first), and if I crash and burn will attempt with the EMS version
I will also be setting up a new realm for authentication so that it doesn't interfere with my regular tunnels. This is a best practice anyway given the different mode of authentication.
With the boring stuff out of the way, let's get started!
Setting up Azure AD as the Identity Provider (IdP) and FortiGate As Service Provider (SP)
The first step in this process is to set up our SAML IdP, this is unique to your chosen platform. Here's what you need to do to set it up for Azure:
In Azure AD go to 'Enterprise Applications' - once you're in the Enterprise Applications view click 'New Application'
Under the 'Add from the gallery' search for 'FortiGate SSL VPN'
Select the 'FortiGate SSL VPN' result and click 'Add'
In 'Assign users and groups' Assign the appropriate users
Click on Set up single sign on > SAML-based Sign-On
In step 1 'Basic SAML Configuration' You will want to configure the following: Identifier (Entity ID): http://<realm fqdn>:port/remote/saml/metadata - if using default 443 you can omit port Reply URL (Assertion Consumer Service 'ACS' URL): https://<realm fqdn>:port/remote/saml/login Sign on URL: https://<realm fqdn>:port/remote/login/ Logout URL: https://<realm fqdn>:port/remote/saml/?sls
NOTE: Make sure your URLs in your configuration match exactly, and the URLs include the SSL VPN service port. I had a lot of trouble by omitting just a '/' in one of my URLs, they must match exactly

In Step 2 we specify the attribute the FortiGate will be passing off to Azure as the user principal name. Click 'Edit' > Add new claim and configure the following Name: username Namespace: leave blank Source: Attribute Source attribute: user.userprincipalname And click 'Save
In Step 3 download the Base64 Certificate - we will be installing this to the FortiGate as a remote certificate under System > Certificates > Import 'Remote Certificate'
The remote cert will be imported as REMOTE_Cert_X (Where X is the number of the cert), you can choose to rename it via the CLI
config vpn certificate remote
   rename REMOTE_Cert_1 to azuresso.cert
end
Now we configure the FortiGate as a SAML Service Provider (SP) - this is CLI only, here's what the config should look like:
config user saml
 edit "uv.sso.saml"
  set cert "local-cert-name"
  set entity-id "http://<fqdn>:<ssl_vpn_port>/remote/saml/metadata/"
  set single-sign-on-url "https://<fqdn>:<ssl_vpn_port>/remote/saml/login/"
  set single-logout-url "https://<fqdn>:<ssl_vpn_port>/remote/saml/logout/"
  set idp-entity-id "Azure AD Identifier in Step 4"
  set idp-single-sign-on-url "Azure Login URL"
  set idp-single-logout-url "Azure Logout URL"
  set idp-cert "Azure Base64 Cert"
  set user-name username
  next
end
A few notes on the entries above: user-name: needs to match the claim name for step 2 idp-entity-id: is the Azure AD Identifier in Step 4 of SAML-based Sign-on idp-single-sign-on-url: is the Login URL idp-single-logout-url: is the Logout URL

Now that we've set up Azure as a SAML IdP and the FortiGate as SP, we can now set up the Conditional Access.
Setting up Conditional Access
Conditional access allows you to set up 2 Factor Authentication based on the 'application' the user is trying to access, in this case when attempting to VPN into our network we want to make sure the user is forced to authenticate with a 2nd factor.
In the properties of our FortiGate SSL VPN Enterprise Application, go to step 4. Conditional Access > click new policy, and configure the following:
Name: Give the Conditional Access Policy a meaningful name
Users and Groups: The users or groups you want to provision SSL VPN access to
Cloud Apps or Actions: the FortiGate SSL VPN Enterprise Application we added earlier
Conditions: The conditions by default are fine
Access Controls: Under 'Grant' select 'Require multi-factor authentication'
Create SAML SSL VPN user group
This too will be done via CLI given that the SAML configuration is only visible via CLI, here's how it's done:
config user group
  edit saml-group
    set group-type firewall
    set member uv.sso.saml
  next
end
Create Authentication/Portal Mappings
If you have specific portal mappings, you can configure those under VPN > SSL VPN Settings > Authentication/Portal Mapping
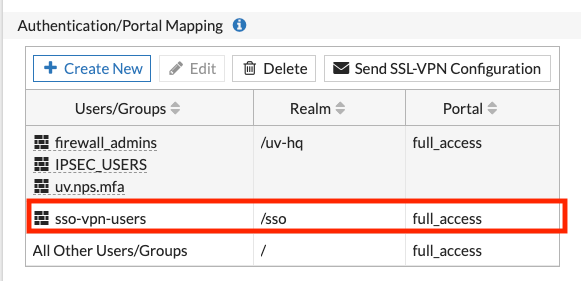
NOTE: Don't forget to create a policy and adding your SAML SSO user group to it, otherwise you will get a 'permission denied' error.
FortiClient VPN Configuration and testing
Now this is is where things get interesting, my Mac client did not appear to work, it seems as though that's still in the works. Upon reviewing the documentation a little closer it appears that only Windows is supported at this time. No worries I will go through creating the tunnel in the video below:
And that's really all there is to it! I hope this was helpful, thank you for reading!

Comments